As you are aware at this point, I own an HTC vive. I actually use it only in a sit down scenarios at this point (this blog is about my cockpit after all :-)).
I’ve been using the Vive for almost two weeks now, so join me to this breakdown of my user experience, so you can make the correct choice for yourself.
However, I will try and describe my experience, both ups and downs. However, I explicitly choose NOT to give a one line bottom line. I firmly believe that VR is very much a case of YMMV.
so if you came looking for a bottom line, save yourself some time 🙂
For the rest of you… let’s get started…
Hardware
first thing first. Hardware is the key,Here are my specs compared to the Vive recommended Minimum specs:
| Vive “Recomended” PC spec (equivalent or greater) | My Rig | |
| GPU | NVIDIA GeForce® GTX 970 / AMD Radeon™ R9 290 | Gigabyte GTX970 G1 |
| CPU | Intel i5-4590 / AMD FX 8350 | Intel I7-2600K @ 4.2Ghz |
| RAM | 4GB | 24GB (DDR3 @ 1333) |
| OS | Windows 7 SP1 | Windows 10 |
Because i’m very flight sim oriented and Falcon BMS currently does not support VR, I’ve been spending some time in DCS:World (and some in other games like project Cars mostly for cross checking performance). I have played some of the Vive’s games, but due to space restrictions, I’m limited to standing only. I had not tried the “space sims”, I.e “Elite dangerous”
Regardless, up front I would say, that by my experience so far “dedicated VR” games, perform much much better then “non-dedicated” games. And DCS really suffers in performance.
The theory of FPS
Current Gen VR headsets, both Rift and Vive, use 90Hz displays, so to get optimum performance, you need to hit 90fps constantly. render target for both these HMDs in 2160X1200, but depending on implementation it might render both eyes at once (i.e generate both then render) or do it per-eye, generate then render, one eye at a time. in this case, we need to be able to push 180fps at 1080X1200 (one eye at a time).
Assuming 90Hz, and what we know about Vsync, to maintain frame integrity, if you can’t handle 90 fps, you cut FPS to half the refresh rate, I.e update the frame every other refresh. because we have 90hz display, our next “hop” would be 30fps, i.e update every 3rd refresh.
FPS in Real life
As I’ve mentioned before, VR dedicated games perform better. with GTX970 giving a solid performance, I’ve never measured FPS, but it was stable enoght for me not to notice any significant drops in frame-rate (other in some very specific scenarios in “Final approach”
But Flights sims are what we are here for, so let’s go back to DCS.
DCS renders eye-by-eye, not sure, but have a solid hunch. holding 180fps is not feasible, it’s batshit crazy to even set up a hardware capable to that at this point. not because there are no graphics cards that can pull it off – I think that a pair of 1080s can do that in theory, they pull more then 200fps on 1440p on some tests. and 1440p is more the the full render target. However, due to “reasons” DCS is not able to push the “world” to the GFX card so quickly. It is in fact CPU bottleneck at this time on most systems. even on my 970, it’s only 70% utilized, as the CPU can’t generate the frames fast enough.
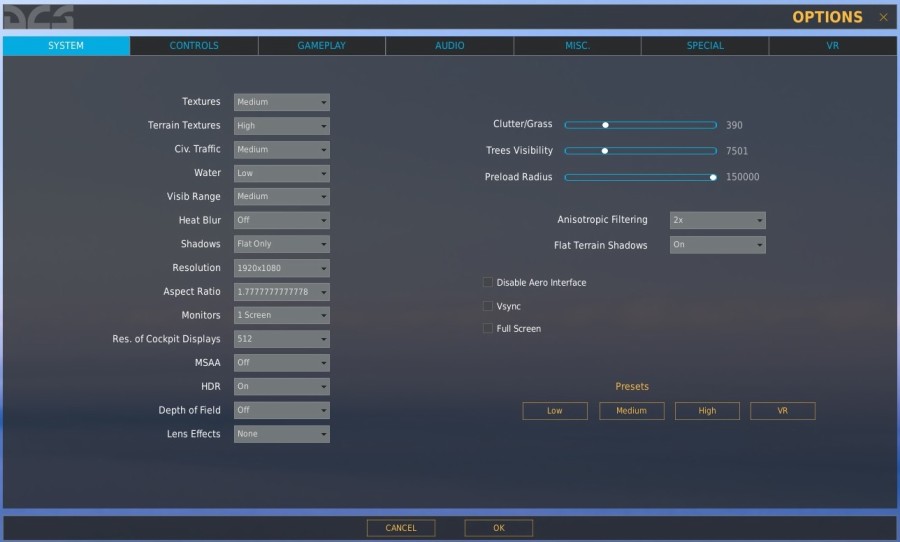
I’ve done my tests on Open Alpha (2.0.2) and OpenBeta (1.5.4) of DCS. I’ve started with EVERYTHING set to LOW, OFF or a minimum value.
Performance, was not stellar, I couldn’t get 90fps almost never (only heading straight up to the vertical in certain scenarios). and I was working on 45fps (still playable) most of the time. and drops to 30fps whn in low altitude over towns. which is bad.. very, very bad. Why? I did tell you that DCS renders eye-by-eye, 90 fps, is actually 45fps per eye, which is excellent. but I wasn’t pushing close to that. 45fps, is more like 24pfs per eye, which is reasonable, and completely playable (unless you are an FPS snob). but going down to 30fps, my god, it’s horrible. why? not only that you get 15fps per eye which is not smooth at all. but worst, I’ve said, eye-by-eye rendering for a reason. when going down to 30pfs, the distance you are traveling between frames is considerable. and because you usually be dropping to 30 fps at high speed and low altitude, it will make it thigs worst. Think about it like this, you are flying past a building, your right eye is endered, the building is 20 meters ahead of your 3/9 line. then the left eye is rendered, but the building is now only 15m ahead of the 9 line, right eye again, 10m.. you see where this is going right? the eyes are not synced, causing a very distinct sense of being cross-eyed. This is why I believe that DCS renders eye-by-eye.
Let the tweaks begin!
OK, so with everything on LOW we can’t get stellar frame rate, so why stay on LOW? let’s assume my card could push 70fps at this point, not giving me anything useful, but I have 30fps to “spare”. so I’ve started bumping up graphics settings, to get the same performance with better looking world.
as a benchmark I chose the P51 “free flight over Poti” mission in Caucasus, and the M2K “free flight” (over Las-Vegas). most of the time I worked on the OpenBeta in Caucasus map. I started by tipping over towards the city, do some 270 turns in low level, goofed around (aerobatics/going under bridges) and went south for landing in Batomi. (or just joyride the strip and the hoover dam valley and land at Nellis if in 2.0)
I got to a point I’m happy with, but the problem is that I have to choose between basic shadows and HDR. both of them, IMHO are critical for immersion, flying very low and not seeing any shadows, or looking straight into the sun and seeing a yellow circle… nope.
However, with both options on, it got a little uncomfortable for me, especially coming in for a landing and watching the FPS drop to about 25fps (probably the 24ish mark, of draw every 4th refresh). So I decided to go with black magic to solve it.
Over-Clocking the GPU
My card is Over Clocked from the factory, but I’ve decided to push it some more. started by using this tutorial.
initially I got good results with +175 MHz core and +100 MHz memory, and it boosted up the card performance from ~1150 pts to ~1400 pts which is significant. that boost allowed me to turn on the shadows and HDR while maintaining a reasonable performance.
And then my GF turned off the AC in the house because “she was cold”. The card didn’t overheat, it was still very much in control over temps, but artifacts started to show up here and there, and the Vive had developed a new hobby. when the card “burped”, in this I mean the clock dropped from 1500+ MHz to 200 and back up, SteamVR would hang. the headset would still work, but nothing else would. so I moved my head, and the static image moved with me… annoying. so I stepped the card back and settled on +150 on core and +75 on memory. with ~1375 points on the valley test.
but Instability was too annoying. I couldn’t get consistent results.
So I’ve opted to go with the less flexible option, and used Gigabyte OC Guru II software. It has pretty much the same options as the MSI afterburner but the GUI is simpler. Anyway, OC Guru came with +175MHz on the Memory, I’ve added the +175Mhz on the core clock and re-adjusted the Temp threshold and it seems to be much more stable on overclock now. so as with everything.. YMMV.
Cockpit readability
Main Problem with Current Gen VR HMDs is the readablity of the cockpit instruments, In the P51 I couldn’t read the compass, in the A10 the text on the HUD was almost impossible to read, and in the M2K the radar was just a block of green and black. which is very bad of any serious operation (not talking about Joyrides). however there is a solution for that, but it comes with a cost. In 1.5.4 We were introduced to a VR settings page, that sports a new “Pixel density” slider. The slider only works on the Oculus Rift at this time, But there is an equivalent in the Vive config.
The slider actually is a fancy name to an old technique, Super-Sampling. The theory behind it is simple. in a certain target resolution you can put a finite amount of details, and then you apply Post-processing filters like Anti-Aliasing for example. But that comes with a cost. for smoothing out pixel edges, (which is what AA does), you pay with details, you need to “smudge up” the small details. The other option is to brute force it. If you render a scene 4 times larger, do all your post processing on the bigger image, then resize the image down to the final resolution. The output is usually better quality then the one rendered in the target resolution. This is Super-sampling, you get higher details in the final frame, at the cost of framerate, as you need to process many more pixels. with a multisample factor of 2.0, rendering 1080p is actually rendering a 4k scene.
Nvidia has this feature in their drivers under the name “DSR” for normal screens, Oculus call it “Pixel Density” and on SteamVR (Vive’s SDK) it’s called “renderTargetMultiplier” but currently you can only activate it via config file edit
Bumping up the render target size will add more fine details to the frame, but it will cost in FPS. for me, 2.0 was a big bump in quality. It really did make the pit readable, but performace tanked. I’ve settled on x1.5, which gave me a good balance in visibility vs performance. But I had to cut down on the graphics settings even more to compensate. But this was an easier trade, because this is pure game play. if you can’t tell where you are going, or where the targets are on the radar, why bother with VR anyway?
So you’ll need to find your balance, depending on your eyesight, performance of your GFX card and your brain’s “autocomplete” ability…
What I ended up with..
So I’ve got 2600K@4.2GHz, GTX970@~1500Mhz Core&~7150MHz Mem. Giving me a fluctuating framerate between 45 and 30, mostly 45. with dives to ~24 on some rare cases (M2k, low level, high speed turn looking down to the ground).
Physical limitations
I’m an old time flight simmer, But that is pretty much all my flight experience. The low resolution is a real problem. it’s not something you notice in most VR games, but in flight sims, the details are everything, your ability to read instruments, to identify targets, to estimate aspect. However, the jump to VR game me an ability to sense the aircraft in a way I never been able to. I can “sense” sink rate, you can judge your pull outs more easily as you can actually see your altitude.
On the flip side, things that are very natural for us Simmers (especially since TIR became a standard), checking your 6, becomes very, very problematic. we don’t have the canopy and the frame to of the cockpit to help us turn around and look. I’ve been using the ICP housing on the CP of my pit to push myself a bit. but it’s hard, so I put my head in angles I’m pretty sure will not work in RL (which ends up clipping the seat or canopy in an M2K – as the F-16 seat is in a different angle).
For example, I’ve stumbled on a post on the ED forums about someone that said that they have a bug with TIR in the OpenBeta, that prevents him from looking at the engines to make sure the fans are spinning. It made me laugh, because of the HMD view angle is focused on the stereoscopic vision area, you can’t see much in your periferial vision, so the look over the shoulder, then look with the eyes to get the extra few degrees doesn’t work. so no, you can’t look at the engine with a VR HMD, it’s very hard (especially with an F-16 ACES II). you can barley see your wingtip in the M2K.
Final Words
I want to believe I’ve made some sense in this long post. I hope that if any of you had been thinking about VR, this article made you a bit more informed.
however, anyone experience VR a little different. if you think about doing into VR, try finding a friend with a headset, and install DCSW on his rig (Su-25T and TP-51D are free). you can try and judge performance on you rig by enabling DSR on your GFX driver to have a render target of 4K screen. this will be rougly emulate the workload of the card with current Gen HMD with “pixel density” set at about 2.0. you need to zoom out as far back as you can (wide FOV) and try and see what FPS you are getting in which setting combo. you need to be able to push 45FPS for most of the time. if you can’t, drop the render target size down a little. 3240*1800 is the render target for 1.5 pixel density.
In the next article, We’ll have some “second opinions” from some guests I invited to take it for a spin.