Well I’ll be short.
I’ll just put this video Here..
That’s it 🙂
Well I’ll be short.
I’ll just put this video Here..
That’s it 🙂
I didn’t write any proper “tech post” in a while. However while working on the ICP I’ve had to re-learn (like everytime) the basics.
This time it’s encoders that got my attention.
The Web is filled with howtos and tutorials about encoders, pages upon pages upon videos. all demonstrating and explaining how everything works.
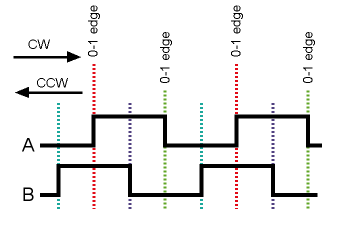
in a sentence or two (or more), Rotary encoders have two output pins, connected to a common pin. When the encoder is in a detent (or stop), both pins are the same state, which is OPEN. when rotated, the pins pulse on and off between the stops, they do it in a staggered way. allowing us to determine rotation direction (and speed) of the rotation. I’ve yet to learn the speed bit, so let’s concentrate about direction. the pulses look something like this:

In this diagram the outputs are pulled down, and the common is connected to 5V. it can of course be the other way around.
to get the state we can use poll, an interrupt pin attached to one of the outputs, or two interup pins. attached to both outputs. the more interrupts you use, the less chance you will miss a pulse causing a step to be missed).
Regardless of the option you choose to use, all the articles have an elaborated list of if statements, designed to figure out which thing goes where.. something in the spirit of:
if (pinA == HIGH) {
  if (pinB == LOW) {
    // it turned CW
  } else {
    //it turned CCW
  }
} else {
  if (pinB == HIGH) {
    // it turned CW
  } else {
    //it turned CCW
  }
}
Anyway, this is long, complex and pretty hard to understand.
But if we create a truth table based on the diagram above it reveals a little loophole.
| what triggered/pin status | A1B1 | A0B0 | A1B0 | A0B1 |
| ΔA | CW | CW | CCW | CCW |
| ΔB | CCW | CCW | CCW | CW |
as you can see, the pin that changed, determins the rotation. if we use interrupt on pin A then:
if (pinA == pinB) {
    //it turned CCW
} else {
    // this is CW
}
Interrupt on the B pin will be the other way around.
And if you are triggering on both it’s also quite easy. you just need to use the correct if statement everytime.
That’s pretty much it 🙂
This week’s topics:
This week’s topics:
I’ve been doing some work on the code, mostly involving i2c commands and addresses. Those are usually given in Hex in the datasheet, sometimes with binary reference, but you might find yourself needing to convert between the two and sometimes to Decimal.
There is a quick way to convert back and forth between all of them by hand with nothing but a piece of paper (you can do it in your head if you are good with numbers – I’m very bad at it :))
Anyway it’s a good old trick but it works.
As I’ve might have mentioned in the past. Arduino was not intended to be “my holy grail” it was a fast implementation (should have been fast at least :)) towards a “better tomorrow”.
Today I’ve made my first baby step towards that future.
Time for our brief quick weekly update.
This week’s topics: