Continuing the Quest for a working FCC controller.
In this post I’ll go over on how the hat switch decided to be the thorn in my ass.
Continuing the Quest for a working FCC controller.
In this post I’ll go over on how the hat switch decided to be the thorn in my ass.
I’ve decided to upgrade my pit and get a Force sensitive mod for my stick. I’m currently using a stock Warthog, and I love it. the grip is fantastic. However, there is only one mod for it, which is the very expensive FSSB-R3 made by RealSimulators. The product seems to be a very good piece of engineering, and is a drop in replacement for the WH, slap the grip on the base and you are done. However, mounting in in a proper stick base is somewhat more problematic. The other Force-sensing mod is the FCC3 by ViperCore.nl it is somewhat cheaper, community proven for years. However, it has a major drawback, it requires the Cougar PCB to work. I have a cougar, but I refuse to use it 🙂 (see my TQS controller series).
But a lack of controller never stopped me 🙂 So I opted for the FCC3 and started to dig into my Cougar to understand what will be required.
In this post I’ll dive into the grip wiring and bit ordering, and all the other fun things I had to dig into a whole bunch of documents to find.
I’ve been using a hand built DED box made out of foam board. it was quick to build, and did the job it was intended. holding my DED in place. But then I was pointed towards a post in jSheppard blog, jshep, creator of the PScockpit system, has been using off the shelf plastic box by Hammond, which in a funny coincidence almost exactly in the perfect size to be a DED.
Shep is using the NH 2.8″ LED, I still prefer the ER 2.8″ due to it’s 5V compatibility, but it will not fit into the box due to the PCB side… or will it? (spoiler alert… it does fit ;))
it is a very long post, that will show how to get from this:

To this:

Hi Guys,
Just a quick update,
I’ve done some re-fracturing to the code making it more readable and easier to configure for those of you how prefer not to dig in too dip into the software more than they must.
I’ve still got some testing to finish, but I hope to get it out my the middle of the week.
I’ve also doing some work to make the FFI usable again on Uno,
Unfortunately the new font is eating more RAM that the Uno can handle – So I’ll be reverting uno users to the old standard font as it was originally – it will be less accurate – but the overhaul performance should be back to reasonable (as it was).
As it is, I’ll stop developing new things for the Uno, and this will be the last release the Uno is the default. I will leave all the current things for the uno, and I’ll make sure I maintain compatibility with it in the base things, but it will no longer be the default arduino.
The Micro (32u4 based stuff) – are the new minimum recommended for now – you can get a pair of “Pro Micro” clones for 10-15USB off ebay, so that is good enough IMHO.
I continue however to recommend getting a Due, or Due compatible board, if you are planning extensive use of this project in your pit.
As the project progress, the added CPU and RAM will git it a very obvious performance advantage.
Other then that…
I’ve started working on Input device, my first victim will be the ICP, I’m planning (for now) to use ATMEGA328P chips, clocked at 20Mhz as input devices using V-USB library.
As a first step, I’m going to rid myself of the need for a programmer, by burning the usnoobie firmware on them. usnoobie, allow the ATMEGA, with a press of a button on boot, to become an ASPusb programmer, and upload code to themselfs, allowing those input devices to be firmware upgrade-able without too much trouble.
another option I’m considering is using the previously mentioned “Pro Micro” as input devices using the LeoJoy project. as the 32u4 has native USB capability saving all the fuss for setting up a VUSB hardware rig. but I’ll get some experiense with both, and deside later down the road. so far using a custom hardware solution seems more attractive to me (just because.. :)) – but the simplicity of using a micro will probably win at some point down the road.
Well, remember I’ve said there is a second OLED screen that fits?
I’ve been following a member of the VIAF.it community, “Cool hand”, that has been following this project, He has published a few links I’ve missed while working on the initial steps. I’ve always known that New-Haven screens are a good option but were a bit taller then needed. Apparently, there is a way around it.
Jsheppard of the VP forums, creator of the PScockpit system, has blogged more then a year ago about a box and a NHD secreen combo that works for the DED.
http://psfalcon.blogspot.com.es/2013/03/how-to-install-our-256×64-oled-display.html
here are the parts on Mouser:
NHD 2.8 Oled
Hammond 1598ABK box
I’ve been using the EastRising display, mainly because of shipping issues – had I been aware of this article, I’ve been using that from the start.
for me, buying two sets cost about 85USD, but shipping this over from mauser costs additional 75USD, that’s why I’ve not been ordering anything from Mouser.
I’m now checking my options, that will probably have shipito (or similar service involved.
I now change my recommendation for a screen for the project to this one. code works, and I will re-design the PCBs accordingly.
——- Update – Nov. 20——-
I’ve been digging into the data sheet, it seems that the screen need 3V rather then the 5v tolarant one from BuyDisplay.
So I’ll thing a little about what is needed, and I’ll probably end up getting an extension for the flat cable and dismantle the PCB the same way it’s done here.
Stay tuned!
——- Update – Nov. 21 ——-
Cool hand has posted his progress on the Italian forum…
As “someone” once said, “Fighter pilots make movies, Bombers make history!” (I hate “Top Gun”! There I’ve said it!)
——- Update – Nov. 23 ——-
I’ve ordered the connectors and adapters I need to try and fit the East-rising display into the Hammond box. I’ll order the Box from Mouser later this week, I’m collecting stuff into my cart there to continue working on the pit (ICP toggles and CMDS panel switches).
because It’s an opportunity to order “real stuff” – with reasonable shipping per item.
I guess December will be a busy month for cockpit electronics 😉
After trying to solve the light issues – I’ve decided to step back and look at the situation from another angle.
I have 4 OLED screens to drive – DED, PFL, CMDS and FFI
they are all using SPI – which means I’m low on I/O pins on Uno and Micro because of the need for CS for each screen.
My light situation is somewhat limited due to the same issue – If I go via SPI, I’ll need another CS pin for every device – and I’ll need to work around my issues with multiple SPI devices.
the Other option is keep the SPI for the OLEDs and swap all the lights to use I2C I/O expenders this will pretty much allow me to wire up everything and power it all via a single Arduino Due (due to the faster CPU and no memory issues). it will also allow me to overcome the issue I had with 3.3V logic on a 5V bus I have with the Due.
The day is finally here!
I’ve decided to release the project with all the issues I’ve found and could not fix – in hope that someone will be able to look at the code and schematics and help me hunt down the issues.
You can download the code from the Download Page
And also available on github:
https://github.com/uriba107/deduino
I hope this initial release would be a stepping stone for things to come! thank you all!
Uri
Release Readme:
I’ve FInally got the PCBs I’ve ordered. it has been a holiday here pretty much all of the second half of September up till mid October. So the post office/customs were barely working – while waiting I’ve noticed a few issues with the main board. which triggered a redesign to Rev.B. In addition, Redneck of Viperpits have pointed out that my PCB design for the Indexers is all wrong, so we have Rev. B on that too.
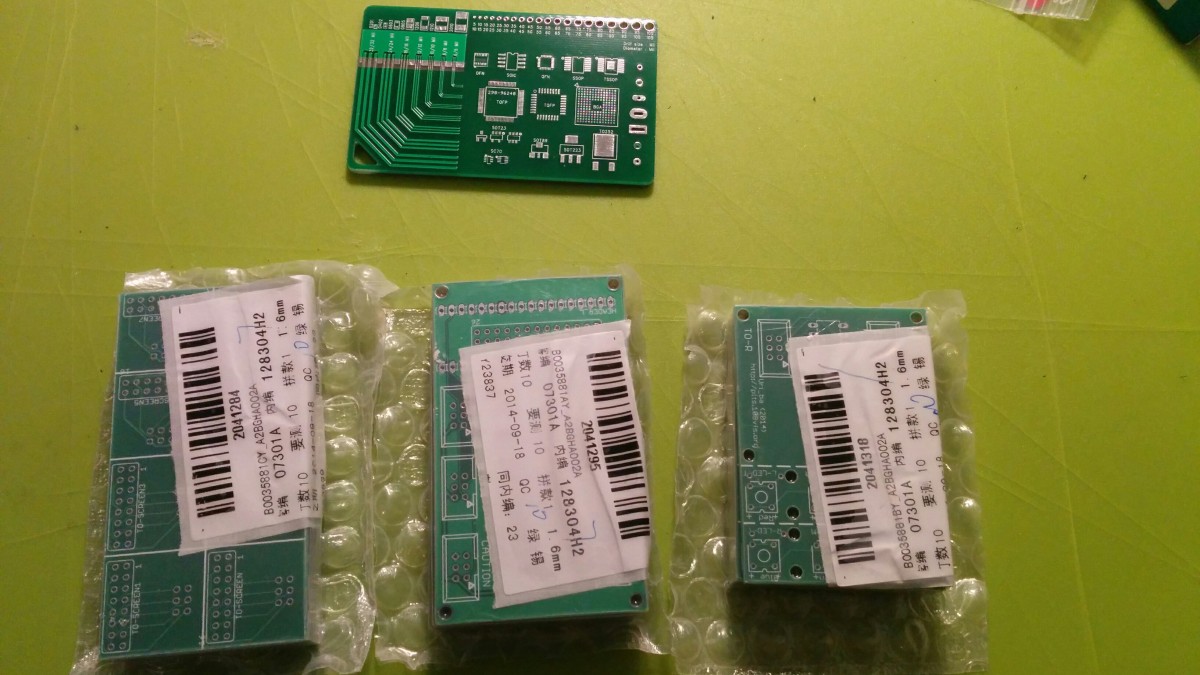
in the meanwhile – let’s look at Rev.A boards in depth and see what we can find.
I’ve had some time this week to finish up soldering the caution panel and control board, wiring the control board was a bit tricky, the control panel is reversed compared to the caution panel itself, and then I need to wire the whole thing backwards, which flips it again…
After finishing up the Caution panel, I’ve started by soldering the Shift registers outputs to the connectors
Once this is done, I started wiring the chips themselves,
Each chip needs to have 5V, GND, CLK and LATCH, OE (Output Enable) tied low RES pulled high. And all of them need to have Serial Data chained in the correct order between all the chips. and of course tie everything into the correct position on the connector – (hoping not to mess things up).
I’ve used my control PCB eagle board design as reference with the schematics – I still hope I haven’t messed up too badly – But I’ll only know that when the boards will come in from china.
Now let’s look at how the Boards integrate with the rest of the project
I’ve been getting some PMs on Viperpits from folks interested in some configuration or another. some what the FFI, others DED, FFI and PFL.
So I’ve decided to use the time till the PCBs arrive and test expected performance
I’ve opted to use my Arduino uno as he is the weakest one (the Micro has half a KB more RAM and a self adjusting serial communication, and the due – well, should be different ball game entirely…). If performance would be Acceptable on the Uno, it will be on every other device too.
I was too last night tired to finish the caution panel (control board wiring is still not done) – so I took the challange and played around with the code – trying to make code changes easier and more coherent and of course fine tune the performance.
This is a step along the way.
Redneck, this one is for you 😉